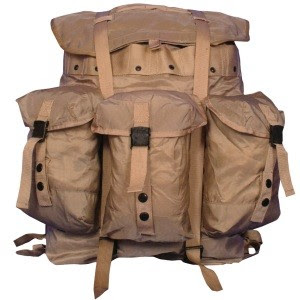
 ALICE pack with metal pinch/slide GI buckles.
Meet Alice. The old girl's been around the block. Every continent, in fact, including Antarctica. Just about everybody in our line of, uh, avocation has toted Alice one place or another.
And compared to some other, newer packs, the design is still great. (Anybody remember the CFP-90? Or the early MOLLE system plastic frame that was a guarantee of lower back problems?)
Problem is, she IS aging and she needs some plastic surgery to keep things from sagging. This problem came up when I recently (being cash poor) arranged a trade for my best ALICE for a tuna can of 7.62x54R. When I pulled the old gal out of storage, I discovered that one of the pinch/slide metal buckles was busted.
Crap.
What to do?
I dropped into my favorite surplus store, AA Army Surplus in Leeds, Alabama, and plopped the old girl down on the counter. "Got a fix for that?" I asked. Turned out, he did.
Here it is:

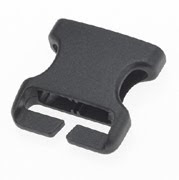
This is the female end of a National Molding easy-on stealth buckle, which I lifted from this link: http://www.nationalmolding.it/natlmold/stealth.html#QAFStealth.
Double A has a big plastic tub of these and he sells them, male and female set complete, for 50 cents each. It takes five to retrofit an ALICE pack, the three pouch buckles and the two that thread through the pack top cover.
Stripping off the old buckles, as brittle as they are, proved easy. It just took a pair of vise grips to hold the thing steady and a pair of pliers to get a bite on the side tab of the buckle and bend it back and forth until it snapped, thereby freeing the strap end.
I did the whole pack in twenty minutes. The fastex style buckles are quicker, quieter and enable you to recycle an otherwise defective pack. Gave a facelift to the old gal without consulting a plastic surgeon. Now I'll be able to ship that pack out tomorrow, no problemo.
If you want to contact Darrel at AA (yes, he's an 82nd Airborne vet) he can be reached at:
AA Army Surplus Store
8216 Parkway Dr
Leeds, AL 35094
(205) 699-4209
Having finished my little project in record time, I went to the 'Net and found this at Dave's Workbench, http://davesworkbench.com/alice.html, which gives you instructions on how to do something similar without buying the National Molding buckles. I found it so useful I reproduce it here with many thanks to Dave.
Living with A.L.I.C.E.
ALICE Pack Modifications You Can Do to Upgrade a Time Proven System
Survivors, scouts, hunters and campers require packs and other equipment that can withstand rugged conditions. Both soldiers and civilians continue to use the military’s ALICE pack and associated equipment. Even our current military personnel return to the ALICE pack when the newer systems have failed. Though ALICE is good it can use some improvement. The old hardware is difficult to get into especially in cold weather. These can be updated with modern hardware, often without a sewing machine. Compared to buying a new tactical rucksack the small cost is money well spent. Many of these techniques can be used to repair gear that would otherwise end up in the trash.
The acronym A.L.I.C.E. Or simply Alice, stands for All Purpose Lightweight Individual Carrying Equipment. It was adopted by the US military in the mid 70s and is still in use today. It is designed in two parts, 1 the “fighting load” and 2 the “existence load”. The fighting load consists of the pistol belt, suspenders, ammo and canteen pouches etc. These items are also referred to simply as “web gear”.
The existence load is the pack in medium and large sizes, the frame if used, and the items needed to live in the field. The pack bag has many webbing attaching points for additional equipment. The Alice pack is often referred to as a rucksack or ruck.We will be concentrating on the Pack system but there is some overlap in the placement and carrying of items.
Alice was designed to use both ALICE attaching clips as well as the older “double U hook” system from WW2. Most of today’s MOLLE equipment will work with Alice. In addition many civilian items can be added to Alice with adapters. The Alice medium pack can be used with or without the frame. Without the frame shoulder straps will attach directly to the medium pack bag. The large pack must be used with the frame. The frame alone can be used as a pack board for transporting bulky items. Some suppliers carry the “Alice small”, this is a commercial item, and it was never military issue. The manual, FM21-15, gives full instructions on use, as issued, for this gear. Readers are strongly recommended to buy this handy little book.
Alice packs can be easily and cheaply modified to modern standards.
Aging packs can be salvaged and civilian gear added with these techniques.
The first and likely best, modification to the Alice pack is replacing various metal buckles with the Fastex quick release style. Alice packs have several metal buckles of the friction type, spring loaded and “lift the dot’ snaps. Though these were simple and rugged for their day the modern Fastex ‘side release” buckle is a vast improvement. The following instructions can be used to replace damaged Fastex buckles on modern gear as well as Alice packs. Soldiers should understand that modifying their gear may result in a “statement of charges” and have to pay for modifying the governments gear. Airborne personnel should also check with the Jump Master before using these techniques.
Replacing the Alice packs buckles require 6 one inch Fastex side release buckles, 6 sections of parachutes (550) cord about 12 inches long. Remove the inner strings on the 550 cord so it will lay flat, tie and hold knots well. Fastex and 550 cord are available from Campmor, REI, and other outdoor and military suppliers You’ll also need a pair of side cutting pliers and a lighter. Look carefully at the photos as a guide. Cut the existing buckle where the webbing feeds through it, then bend and remove. The adjustable webbing on the main bag and outside pockets has the ends folded over and sewn in place. Remove this stitching with a sharp knife or ‘seam ripper”. The seam ripper is available at sewing supply stores.
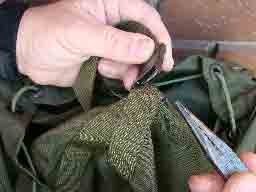
1. Cut the existing buckle where the webbing feeds through it then bend and remove
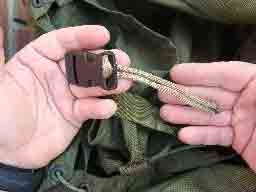
2. To setup Fastex buckle for replacement slip a loop of 550 cord under non adjustable end
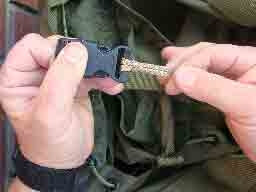
3. and “choke” cord to buckle.
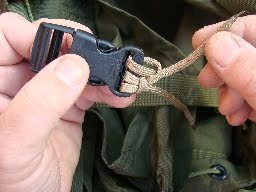
4. Using “half hitches” loop the rest of the first leg of cord out to the end of the buckle Repeat with the other leg of the cord.
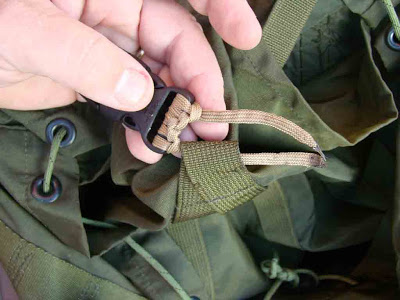
5. Slip one leg of 550 cord into the place where the original buckle was. Repeat with the other leg. Tie securely with a square knot and fuse ends together
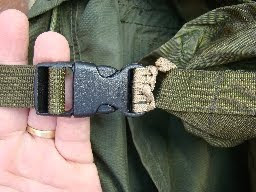
6. With the complete buckle in place and webbing fed through you’re ready to quickly access your gear. In this example we used the Alice packs radio pouch
Take a section of the 550 cord and remove the inner strings. Using just the sheath fold it in half forming a loop on the end. Slide the loop under the end of the non adjustable side of the Fastex buckle as shown. Slip the cut ends through this loop and ‘choke’ the cord tightly to the buckle. Place this ‘choked” cord in the middle.
Using “half hitches” tie each cord from the center to the outside. Pull these tight and even. Using the lighter, burn each end of the 550 cord. Do not breathe the smoke or fumes from the burning cord. Blow out the flame and quickly twirl the end on a metal surface. The side of your pliers will do well for this and should form a slight point on the end of the cord, making it easier to thread it through the webbing in the next step. Insert one end of the cord through the webbing where the old buckle was. Repeat with the other cord and pull moderately tight. Do this a second time and tie a snug square knot. Lastly trim the cords and burn the ends together. Tuck all this back into the webbing if possible. Thread the loose end of the webbing you removed through the adjustable end of the Fastex buckle. Refold and stitch the ends of the webbing to avoid their coming completely out of the buckles. At this point you have upgraded your pack and saved hundreds of dollars over buying a new “tactical” combat rucksack. Yet there is more you can do yourself to upgrade the Alice pack. If you’d like to ‘color code” the outside pockets simply use different colors of 550 cord on the pocket buckles. Parachute cord is available in OD green, tan, sage and black. You still be tactical on the colors yet instantly recognizable. Emergency and SAR members may choose bright colors such as orange, red or yellow. If you’re unsure about cutting off your buckles you can leave them in place. Lacing the 550 cord is a bit more difficult but it can be done. If the modification work out you can cut off the old buckles at a later time.
The “horizontal strap” will allow you to compress the load. This stabilizes the pack, lowers the energy expended to carrying it and adds a place you can attach cases to the rucksack. This can be done in many ways but the easiest is a 1 ½ inch wide nylon straps with a Fastex buckle. Feed this through the nylon web “keepers” on each outside pocket. These are under the brass snaps on the pockets and are designed as a place for you to slip your fingers to squeeze the snaps together. There are several ways to route the horizontal strap around the frame and this will vary with your needs. I typicality wrap this strap around the outside of the frame and then under the center vertical bar. This keeps the strap from slipping down. Some folks carry items such as a folding ground pad or hydration system, in the space between the frame and their back. Routing the strap straight across the frame will hold items into the frame and still allow air space between the pack and your back.
Another quick way to add this is with a GI “general purpose strap”. Route this as above but use a section of bungee cord in between the straps snap hooks. Once you’ve adjusted the strap the bungee cord will allow a bit of ‘give’ under load. When you retrieve items from the rucksack you can pull a bit of slack in the strap and then the tension will return automatically.
Alice attaching clips are used on ammo and canteen pouches etc. These commonly come loose and more than one solider has lost equipment because of it. The best thing you can do is buy a set of brand new replacement Alice clips and throw away any that are damaged. Once you have determined exactly where you want the pouch plastic cable ties will insure it stays there. The replacement “MALICE” clips are excellent.
To remove a pouch quickly, tie a short section of 550 cord to the loops on the top of the Alice attaching clips. When you need to remove this pouch simply pull up on the cord and both clips will open. You can then lift the pouch free. Expensive tactical packs often have a sleeping bag compartment sewn into the bottom. You can add this to your rucksack by using a GI issue NBC bag. This was intended to carry Nuclear Biological Chemical (NBC) warfare protective clothing on the back of web gear. It consists of a small woodland camouflage duffle bag that opens on one end. It has ALICE clips, attaching points for carry on the web gear, 2 compression straps and a Velcro closer. Attach the NBC bag to the bottom of your pack with the Alice clips. There are 2 webbing tabs sewn to the bottom of the pack. Connect the Alice clips to these. You may need to angle them, but it will attach. Next add 2 sleeping bag straps. Route these through the same webbing as the clips and then around the frame Sleeping bag straps often work loose, shift around and can be difficult to get to. To remedy this tie each straps buckle to the packs lower outside buckle. Use a section of 550 cord and run it through the webbing that one outside buckle was sewn into. Then place a sleeping bag strap buckle on the “in board” side and continue running the 550 cord through its webbing. Tie a square knot and fuse the ends together. I leave the NBC bag attached to the packs at all times. The weight is minimal and I have the capability to carry extra gear securely and at moments notice. To access the sleeping bag lay the pack down and open the NBC bag for the end. To stow the bag open the end and stuff it in as you would any civilian stuff bag.
Carry handles are convenient when moving the pack from trucks or storage. A 550 cord handle also assures that you have extra cord for emergencies. This can be made simply from a length of 550 cord tied to the top of the frame. If you’re using the Alice medium without the frame you can tie it to the metal loops where the shoulder straps connect or the top of the shoulder strap webbing. If you use a contrasting color the handle will stand out and identify your pack. The handles may be simple or fancy macramé type affairs.

7. Parachute cord is looped around top of Alice frame providing a handle and keeps a supply on hand for emergencies
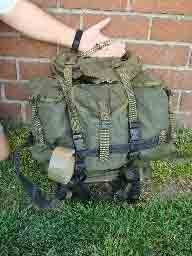
8. Horizontal strap compresses load and is a handy place for additional equipment like this ‘90MPH’ tape
Civilian or foreign surplus pouches can often be adapted to Alice. You’ll need a short length of webbing that fits snugly in the belt loop with a slider buckle sewn on. A section cut from a GI Nylon general purpose strap works well for this. Feed the end of the webbing through the slider buckle. Adjust the length so that about 3/8” extends from either end of the belt loop. Add Alice clips or other attaching method on both of these ends and attach to your pack. Ports for hydration systems and antennas can be added with a sewing machine capable of making large button holes. Make these a little oversized to allow these items to flex. A grommet can be placed in a pack and used the same way. I suggest plastic or solid brass for rust resistance and paint in subdued colors of needed. Replace the packs draw cord keeper with a cord lock. This is as easy as untying a knot and slinging the new lock in place. Tie a knot at the end on the cord and then another 2 inches further up. This forms “tag” that you’ll use to pull on. In cold weather this makes closing the bag simple.
The modifications are almost endless; in fact I have dozens of enhancements and modifications. Those listed here will give you a good start. It will also save money by improving your existing equipment for a few dollars. I have used, and proved these and many more, modifications in over 30 years of outdoor living.
3 comments:
Excellent info, Mike. Much appreciated.
Mike III
Fantastic article, thanks for posting. I feel ALICE gear makes the best purchase for "extra gear" for handing out to other patriots, as it is very cheap and very durable. As the article states, however, it could use some updating....
slightly better than the square knot is the fisherman's knot:
http://www.gutenberg.org/files/18525/18525-h/images/illus_p241fisherman.png
you can still fuse the ends if you want, but you should be able to just bury them in there.
Post a Comment